Friday, July 29, 2011

Product Review - Niji Pearlescent watercolor


Just wanted to share something new that I got and am so loving it right now...
Its probably the best 5$ I ever spent on something...and so totally worth it...

 My Pearlescent Watercolor set...from Niji..its got 21 colors..a bit less than what you get in Twinkling H2O's but totally awesome. It has very shallow pots..it looks like its very less, but when it comes to this...just a little bit goes a long way...

And you don't have to keep it open for 24 hours for the water to dry like you have to do with H2O's. (else the H2O's catch fungus!!)


Just to show you  a little bit of its effect, here's some butterflies that I colored...oh they look glamorous!!

you can paint with it as it is. or layer on top of your watercolored images as a wash. It will blend well.
Some colors are missing, but you can always mix and match.


Feel free to open this pic in a new window and see it in its full size.... and full metallic shimmer

If you love water coloring and if you love shimmer, this is one thing you can put in your shopping cart...I guarantee you, you will love it..
I got it from Joann. Its also available at Dick blick and Scrapbooking alley.

Tuesday, July 19, 2011

Echo park and new stamps

A little beachy theme and new stamps to use...

Papers- Cloud (summer days), waves (splash-EP), 
Stamps- Dolphin -Imaginisce, Turtle - hobby ideas, Sun & sentiment - Hero arts (Kiss from the sun)
Colored with bic-it markers,
Memento Tuxedo black ink, seed beads from stash, googly eyes-itsy bitsy, glossy accents on the turtle.

There's a lot of mixed products on this card...Papers from Echo park, Stamps from Imaginsce, hero arts and hobby ideas. The waves have been cut and popped up with two different sizes of foam tape...and the dolphin and turtle are popped up as well..

I don't know if you can see, but there is a black foam tape and a white one..the black is 2mm and the white is 5mm..just for dimension..

Till later

Monday, July 18, 2011

Paper Trimmers

These tutorials/reviews are a product of extensive reading, researching and lots of time spent on making them. Please do not copy, or share on your page (for promoting your items in your shop) unless I give you permission to do so. Please ask nicely....I won't say no...but you need to ask.... You can link it on your blogs if you have used these tutorials...please share the link with me when you do use these tutorials...I would love to stop by and see what you have done! 

Yes, yes...its finally the turn of the paper trimmers...I had to abandon my SIP (stamps ink and paper) post to get to this....You guys are one impatient lot! :)

Firstly there are three types of trimmers - one comes with a straight blade, the other comes with a rotary blade and the third comes with guillotine blade.

The straight blade/V-blade is the most common of the paper trimmers..It has a small blade that will slide in a specially designed track.
Pic courtesy-www2.fiskars.com
 There are many many brands available... There is Fiskars, Tonic, Carl, Cutterpede, Cricut, Martha Stewart etc..

These are just the different brands..but essentially all have the same kinds of blade.
Coming to the pro's and con's.
I personally don't prefer this kind of a trimmer, so far. But there are some who will swear by this kind of a trimmer. So its a choice you will have to make as to what to buy.
  • Most of these are within the price range of 15-25$. 
  • You get different blades for cutting and scoring, and additional zig-zag, waves, postage border, perforating etc (in some models)
  • Clear ruler to see where the paper cuts through.
  • Board sizes are up to 5 1/2 to 6 inches, and some come with a fold-able arm to measure papers up to 12". So if you open the foldaway arm, you can cut a 12x12 sheet of paper, in most.
  • The main advantage with this is, you can start cutting in the middle of the sheet of paper, or add slots, which you can't with the other paper trimmers. 
  • Blade cuts both ways.
  • Highly portable. 
Cons-
  • The need for replacement blades. All of these will need replacement blades every 6-8 months depending on your usage. Some have used blades for 2-3 yrs, some wear out a blade in 6 months. 
  • There is chance with excessive usage, the carrier strip (the groove where the blade runs) may wear out..again that will need replacing.
  • If you blades have started becoming dull, your paper cuts will feather out. 
  • Since the clear plastic ruler sometimes gets scratched or cut while cutting paper, your groove itself will become crooked...again leading to inconsistent cuts. 
If this is the one that you want, going by the reviews, I would recommend the Fiskars SureCut Deluxe paper trimmer. 
So far, I have read the best reviews of this across all boards. Maybe one of you who owns this can do a review separately.( JK, wink wink..I'm hinting at you!) Here is a video showing this trimmer's short but sweet review

Coming to rotary trimmers..

They have a circular blade housed in a cassette holder.  I don’t know much about them, except that some of them come with a self sharpening tool within the cassette,  so everytime you use that cutter, you sharpen the blade as well…
They do last for a pretty long time. Again, the track in which the blade runs, might need replacing once a year …again depending on y our usage.

This is what the blades look like.


 Costs around 40-50$ on an average.
 There are some who swear by rotatry trimmers and some who would not use it. Here is the video of one such trimmer in action.

Fiskars, Carl, X-acto are some of the companies that have fantastic Rotary trimmers.

Now my favorite trimmers, The guillotine style trimmers.
 
Pic courtesty - Julia Stainton
Click on over to read the most wonderful review of this trimmer..Warning..I'm a highly biased when it comes to this kind of a trimmer..so I will favor this..form your own opinion on your usage.

Pro’s
  • Self sharpening blade. Never needs replacing. At least not for 4-5 yrs .
  • You can get very thin slivers of paper if needed. I have cut up to 2mm thin slivers and long thin curls for paper bouquet..
  • Impossible to  cut your finger in the guillotine..(I tried once)
  • Comes with a good paper gripper, to keep your paper steady while you’re cutting.

Cons
  • You cannot cut into the middle of paper, to cut windows or slits.
  • It takes a while to judge where the cut will be exactly.
  • Bigger trimmers mean bigger handles..it can get a little bulky. (12x6, or 12x12)
  • Since the blade is self sharpening, over time, it tends to shave very tiny bits of metal off the cutting edge..after 4-5 yrs, the lower edge may give you inconsistent cuts.
  • There are no replacement blades, if your blade cuts wonky, its time to get a new one.
This is what I own.
My personal experience: 

I’ve had my Fiskars 8.5 x 5 trimmer for 5 yrs now. Never ever had a problem..Recently, I do find that my mats are inconsistent by 1-2 mm or so…you could never see in the cards, unless I tell you.
But other than that, no problem at all…I got the hang of judging my cut, within 3-5 days of using it.


It is always recommended to cut all the way through to the end of the blade in this type of a cutter, to keep the blade sharp.
Best ones in this category are Fiskars, Tonic. Would recommend this without hesitation.


And now to the ones that are available in our market...
Morn Sun is one company from Taiwan...they're in the range of 800-1000. Very small base, but does come with multiple blades. 

I am hesitant to recommend this because of its small base. I don't know how steady it will hold the paper while you cut it. Anyone who has it, please share the review.
I haven't used it, but seen in my stationery superstore in Mumbai. Ananda Stationery in Chennai also stocks it. I think you could get it around in stationery stores that stores exclusive items..maybe Venus in pune, Anupam Stationery in Mumbai.

The other is Deli brand. They have 3 guillotine style trimmers. Plastic base, wooden base and metal base. The plastic is the most portable, and all are 12x12. So you need a place big enough to keep it. 
The last I inquired they were in the range of 1500-2000 Rs. 
 
 I have had a lot of problems getting the plastic one..and 6 months down the road, still haven't found it.

These are the only ones I know of. Keep updating me with what you know and I'll keep updating over here. 

P.S. I'm making a separate page for all the tutorials and basics info that I've done. Easy to locate, right under the header.

Saturday, July 16, 2011

Simply Sketches #7

Did I hear someone say they missed my butterflies??? Well they're back...I have my eye on the glitter that Smriti is giving out...and well what better motivation do I need..it took me long, till the last day to do it. Was busy finishing the album and had to send it off, my friend flies back to the USA tonight...So Smriti, I hope you forgive me for such a late entry!!

I have used a lot of different types of butterflies on this one layer card...yup one layer and took me one and half episdoes of CSI to finish it... I love watching CSI, NCIS..love it...and its always on when I'm working on something...I love all the hunks in the show! anyone with me?

Supplies-Fabriano Academia , Aqua and Fuchsia CS, 
Martha Stewart Classic butterfly and 3-in-1 butterfly punch
 PTI butterfly Die. Stamps-Butterfly dreams (PTI).
Bling from stash. Ink-Memento Tuxedo black

Die cut PTI butterfly with aqua CS, stamped on it with Butterfly Dreams stamp.
Punched 3 butterflies with MS classic B'fly punch, stamped on it with Butterfly dreams and layered that stamp with a small butterfly from MS 3 in 1 B'fly punch.

The sentiment was in two lines and I wanted it in one...so used my Stamp-a-majig for the first time...will get some getting used to before I get perfect impressions.

So that's it..short and sweet..
Keep checking out the sale page..I'm putting out a few things now and then...

Before I log out,  just a warning for those who want to see Harry Potter 7. Don't compare it to the book. Just watch it for the darkness of it...If you have high hopes for the movie, based on the book, don't!!! The movie has 1/10th of the magic, the thrill, the sheer drama that the book creates...Movie doesn't even come close to the book.
My Hubby not being a fan of Harry Potter loved it...why? Coz thankfully there will be no more harry potter's to suffer through. He's so glad it's over!! Sorry honey, there still Twilight to suffer through!! :D

Friday, July 15, 2011

Wedding album

Took me a while to put this up..., I decided to show you a video rather than the tons of pics I'd have to put up...
In the video, please ignore my dirty nails and everything else beside the album.

I've mostly kept the album simple so there is more space for the photos...and I loved the papers too much to cover them up.


You can watch the video here or at my You tube channel..

I've used loads of CB embossing folders, alpha dies and bling..Let me know if you want to know something..will surely get back.
The album is done from this tutorial by Laura Denison.


Supplies- Inque Botique papers- Memoirs (Thanks Lani for this beautiful paper). 
Cuttlebug Embossing folders, Olivia Alpha Dies (Thanks Vaishali), 
Martha stewart - Deco shells round the page punch, label 1 spellbinder dies and  Fancy tags dies,  (on loan from R...) Distress ink - vintage photo


Tuesday, July 12, 2011

Post 3 for today- Jewelery

Just thought I'd share some of the crazy things that I've been making...all of these are for sale if you're interested..just drop me an email.

 This is the butterfly bead from Pie lane...I loved the beads the moment I saw them, and this is exactly what I had in mind...Love the beautiful blue colors!!

I found some gorgeous heart shaped glass beads and had to buy them...unfortunately I didn't have the proper hooks for this earrings...as soon as I get that, this will be ready to wear!! Love the dangly size...

This was my attempt to make a big cluster charm..I think it needs a bit of length...First try..good enough...my mum-in-law thought it was my earring!! :)

This is how the cluster looks when it dangles!  This is so darn addictive to make!!

So what say? Good stuff?

Showing off the legs!

Okay, so that's a weird title for the post, but that's the challenge at Less is more...SOMETHING WITH LEGS!
... this is also for the Wee memories, Summertime theme..

 Stamps- Tag it's #2 and Signature Butterfly -PTI 
Furry boy- old hobby ideas stamp, colored with Distress ink-Fired brick.
Inks- distress-peeled paint and shabby shutters, Memento-Rose bud and pear tart, Tuxedo black.

 I loved the process of creating this card...I made the hill for my furry boy to do a cart-wheel and show off his legs! 
I used this tutorial by Kathy (The Daily Marker) to create the hill using my distress inks (Shabby shutters and Peeled paint)

 The furry boy is from an old Hobby ideas set. (p.s I've stamped him upside down...he does stand on his two feet)

This is post no#2 for today...there is still one more to go!!

Pink


I think I've used the last row of the grid, Flower-Emboss-Gem.


I had been dying to use my embossing folders and make that the prime focus on the card...I think I'm addicted..but I hate the smaller folders...I love the new 5x7 ones and I hope Provo comes out with more designs in 5x7....
The Die cut is Spellbinders Label 8, and sentiment-PTI (yeah, it is crooked, its time I spent some money on grid acrylic blocks! The flower are two layers of  PTI die cuts (Thanks Priya Venkat)

By the looks of it, dark pink hates to be photographed...it looks horrible, no matter how much I edit it..!! oh well!!

So hope you like it..

Monday, July 11, 2011

Awards

Thank you everyone for your wonderful response and wonderful commendation on my Basic's post. Makes me want to post every darn thing I know. I will...slowly...post by post...

Before I get down to playing with my Cuttlebug to create soemthing new...let me just stop for a second and thank everyone for the awards that they've showered on me. I have been lazy in posting them...Loads of apologies ladies!

First one comes from Hussena...Thank you so much for thinking of me...if you've got a moment, drop by her blog to see fantastic quilling creations...simply stunning!

I'm supposed to list a few things about me...But I've already done this before ....

and since most of you have this award...please feel free to pick up and post it on your blog...

Second is from the uber-talented Dr. Sonia...hop over for amazing pop up cards and super simple tutorials...also catch glimpses of the new crafter in making..her little one!!

Thank you Sonia for such sweet words and wonderful heart warming comments!! I hereby pass this award to everyone who reads my blog..please post it on your blog...and consider this a virtual hug from me!!

SALE STUFF:

I have updated my Sale page (on the top, below the header) with some Cuttlebug dies and embossing folders..stamps will be coming soon in the next week or so...

Please email me if you're interested and I will get back to you as soon as possible.

Thursday, July 7, 2011

Basics of Card making/stamping -Part 1

These tutorials are a product of extensive reading, researching and lots of time spent on making them. Please do not copy, or share on your page (for promoting your items in your shop) unless I give you permission to do so. Please ask nicely....I won't say no...but you need to ask.... You can link it on your blogs if you have used these tutorials...please share the link with me when you do use these tutorials...I would love to stop by and see what you have done! 

I'm sure everyone has a list of what they call their basics..And I'm just sharing mine.Some  stampers/cardmakers wanted  info on basic paper crafting supplies and what to spend on. I thought I would provide my two cents...

I've been crafting since 2006...so whatever you see in my stash has been collected over 5 years, and I'm a very frugal shopper. Everything that came from USA is on a discount or brought during sales.

I've never paid full price for any of the items, and I rarely pay shipping. I make sure I shop at sites that give me free shipping. That way I have less guilt over spending ridiculous amounts of money (enough to feed a family for a month). It doesn't hurt to have great friends who are willing bring your stuff over to India.

This will be a long post, so have divided it into parts..I have not planned out anything, but lets see how it goes..
This first  part I'm concentrating on your Basic Tools...then will cover stamps, inks and papers (maybe in 3 different posts) . As I go along, your comments, questions will help me plan further posts...

This is the box that is always by my side when I'm crafting..

It contains all the stuff I need for everyday crafting..there is a lot lot more than this..but basics first...


 First rule of basics, get yourself a good pair of SCISSORS. I changed 3-4 till I found one that I could cut without hurting my hand. The orange fiskars one has served me really well for over 3 yrs...you'll need it for trimming your images, cutting card stock.
Always keep a sharp scissor separate for cutting ribbons. While cutting paper, scissors get dull, and will not cut ribbons as sharply. The Tim holtz scissor has been on my wish-list for 3 yrs..just got it 2 weeks ago and still getting used to its huge grip. Its mainly for cutting unmounted rubber stamps, cutting into my foam tape..which is sticky! This being a non-stick scissor, cleans easily.

Next is your Self healing cutting mat...necessary when you're cutting paper with blades or knives. Easily available in the market.

A good paper cutting blade (blue/yellow) and an CUTTING KNIFE..this one is by Camel, called Precision knife( haven't had to change the blade for over a year)..super useful for cutting out detailed images or centers of the images.

The tool on the extreme right, is what I use to pierce even holes on my project, or when I'm stitching. I have no clue as to what its called, but you will find it any shop that sells Embroidery stuff. Its similar to the Sew-Easy that is a current rage. 

On Left is my nail filer...Emery board..I use it for giving a finishing touches or distress the paper..I use it to clean up the edges of my scrapbooks too. I picked it up from a beauty shop ;)

My un-sepearable companions...My camlin 0.5 mechanical pencil (its been with me for 4 yrs now), an eraser, my white Uniball Signo gel pen, Black Sharpie marker, black sketch pen, and my water brush. (You can very well use a paint brush). You need a good ruler too..that goes without saying!!!

The white gel pen and the black marker (0.5) I use to create faux stitch lines, sharpen my stamped images with black if it hasn't stamped out properly.
And wonder what I do with my expired credit card? I use it to spread out the glue...and flatten the paper after sticking it on.


Lastly I have the corner rounder, a stack of post-its, removable tape (Scotch magic tape or invisible tape) and a basic black ink pad, which I refill with Faber-castell ink, glue and gloss, and Fevicol (forgot to show). And my newest purchase, The bone folder (paper creaser)

You do get indian corner rounder, used for photos..you can pick that up..it gives a good finish to the cards.
Post-its when I want to mask and image or just write down the measurements...removable tape-again to hold the masks in place. (just don't use this or any other tape on mulberry paper..everything rips off)
Black inkpad for quick distressing.

Bone folder (this one is of plastic not bone or teflon) is something I thought I didn't need. But after using the back of a spoon to give a good crease, using back of a ball pen..everything...This felt marvelous. And this the one purchase I would love for you to make. Indispensable.
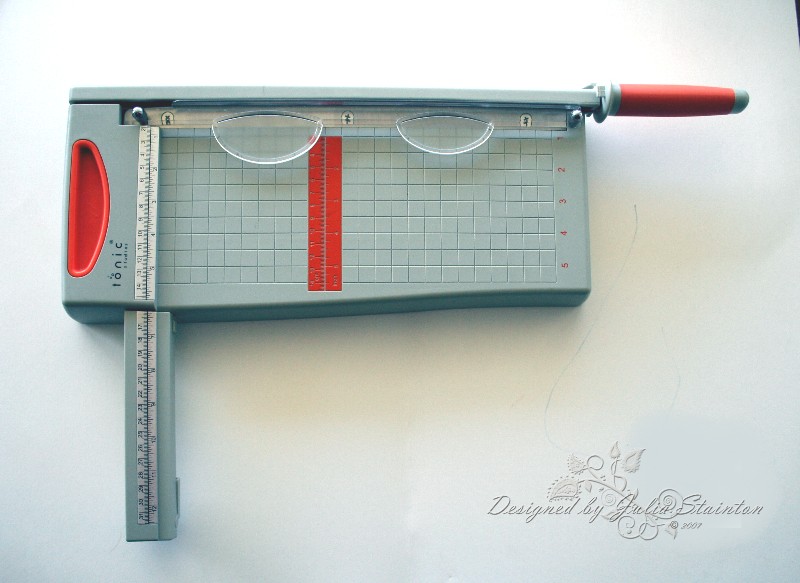
Last one, my paper trimmer. I love it.
If you are good with making straight cuts with a precision knife and a ruler...you don't need any kind of trimmer. But it does save you a lot of trouble. I own a 8.5x5 guillotine paper cutter.
Which paper trimmer/cutter to buy is matter for another post...if you want one, I can list out another post with the pros and con's of each...

Phew that is lenghty..but too many photos too!! next will be on SIPs!!! Stamps, paper and ink. I'm not going to list what's available in the market, I'm just listing what you need to start. Then as you discover, you can explore and make your own choices!

If I've missed anything, let me know..will edit and add accordingly!!
Thanks for reading this far...

Monday, July 4, 2011

Pink on Pink Monchrome


I had been rather busy with my mum-in-law coming back from the states after 3 months...but you know what that means...I got tons of stuff...she was so sweet in running around and getting things for me..thanks mum!
I got my Cuttlebug (YESSS!!!) some PTI dies, some Spellbinder dies.So I had to utilize all of my new supplies in making my card...
Here's my card...

          Card base- Rose Fabriano 220gsm CS, Spellbinder's dies- Label 8, PTI butterfly die,
Stamp-Butterfly dreams, and Signature Greetings
Distress inks-worn lipstick, and Memento-Rose Bud,  
Button from Pie lane, ribbon and rhinestone from stash

I used a technique used by most copic users to give a border to my die-cut. After cutting out my die-cut label, I kept the die in place and sponged distress ink. It gave a nice border to the die-cut.Stamped the sentiment using same distress ink, its from PTI Signature greetings.

For the diagonal strip, I ran a dark pink paper through the embossing folder, and cut 1/2 inch strips. Adhered them at 1/2 inch intervals. 

The butterfly was die cut, stamped with rose bud ink using PTI Butterfly Dreams set. Bling from my stash. 
Ribbon is from my stash and button from Pie-lane. 
Shockingly this card does not have any glitter!! I should have used some!! 

The reason I'm busy so much is that I'm working on a Vintagey mini album for a friend who got married yesterday..here's just a pic of the last page...I loved the glitter papers from Itsy bitsy and not being able to punch them out was a bummer, but they cut beautifully with a cuttlebug...horray for that..now to find a good alpha die-cut set. Someone please keep an eye out for me...for the Olivia alphabets from Cuttlebug. 

This is a 6x6 page. The dies are on loan from Vaishali, whom I met up with...after 3 weeks of planning!! Something or the other always came up..but this week, I had to go meet her...I was so happy to have finally found some real friends in this city...3 years in this city and I have only 6-8 friends that I know...Thanks for a wonderful day Vaishali...
Related Posts Plugin for WordPress, Blogger...